About Locate a store
Finding your stores is easier than ever with the user-friendly interface of Store Locator extension. The module supports street view & shows directions from the user’s current location to the store’s location instantly on a Google map. Customers have the ability to search for the nearest stores by radius, city, or zip code… Other key features are included such as filtering stores by product type, displaying store’s information (full address, phone, email address, description and store logo/image), and exporting stores into CSV file.
Encourage your customers to spend more, by notifying them how much more they need to buy, to qualify for Free Shipping.
Why this store locator extension?
You have a chain of physical stores and wonder how to help your Customers find the nearest one? No need to look any further as our Magento Store Locator extension is exactly the right solution for you! With various search criteria and a friendly user interface, Customers can easily locate the most convenient store nearest to his current location on Google map.
Note: The store owner must have to purchase the sms service from sms provider and set the sms api detail and credential in admin along with sms message text.
- No change on your Magento core files
- Works with standard Magento hooks
- Store Grid with export/search/filter
- Store Search By Location, By Product and By Distance.
- Ability to set default latitude/longitude
- View the list of all stores with basic details and address
- Access stores’ external link (official website or social channels such as Facebook)
- View details of each store including address, phone, email, description and store logo
- Can choose the preferable view between map or satellite
- Filter stores by Products
- Search for stores by distance or specific area (state/ province, country, city or zip code)
- Add Custom Map Pin Icon for your map marker
- Footer link for Store Locator Page
As an admin, when using Magento store locator, you will get following benefit
- Allow adding many store details such as address, contact info, external link, product, Store Logo/image, Email Address etc.
- Get Latitude and Longitude by adding address if you dont know exact latitude and longitude
- Sort stores shown on Store List by alphabetical order
- Add Custom Map Pin Icon for your map marker
- Set default zoom, latitude, longitude, radius etc.
Other features
- Magento Store Locator extension supports multiple stores
- Easy to install and configure
- User-friendly interface
Installation
Your magento 2 extensions can be installed in a few minutes by going through these following steps
Step 1: Download/purchase the extension
Step 2: Unzip the file in a temporary directory
Step 3: Paste “StoreLocator” folder into MagentoRoot/app/code/Doyenhub directory.
Step 4: Disable the cache under System >> Cache Management
Step 5: Enter the following at the command line to setup extension:
bin/magento module:enable Doyenhub_StoreLocator –clear-static-content
bin/magento setup:upgrade
bin/magento setup:di:compile
bin/magento setup:static-content:deploy
bin/magento indexer:reindex
Note: Clear the store cache, clear your browser cache, domain cookies, and refresh the page.
If you change theme from admin you have to remove pub/static and re-deploy pub/static.
Uninstallation
Enter the following at the command line to setup extension:
bin/magento module:disable Doyenhub_StoreLocator –clear-static-content
bin/magento setup:upgrade
bin/magento setup:di:compile
bin/magento setup:static-content:deploy
User Manual
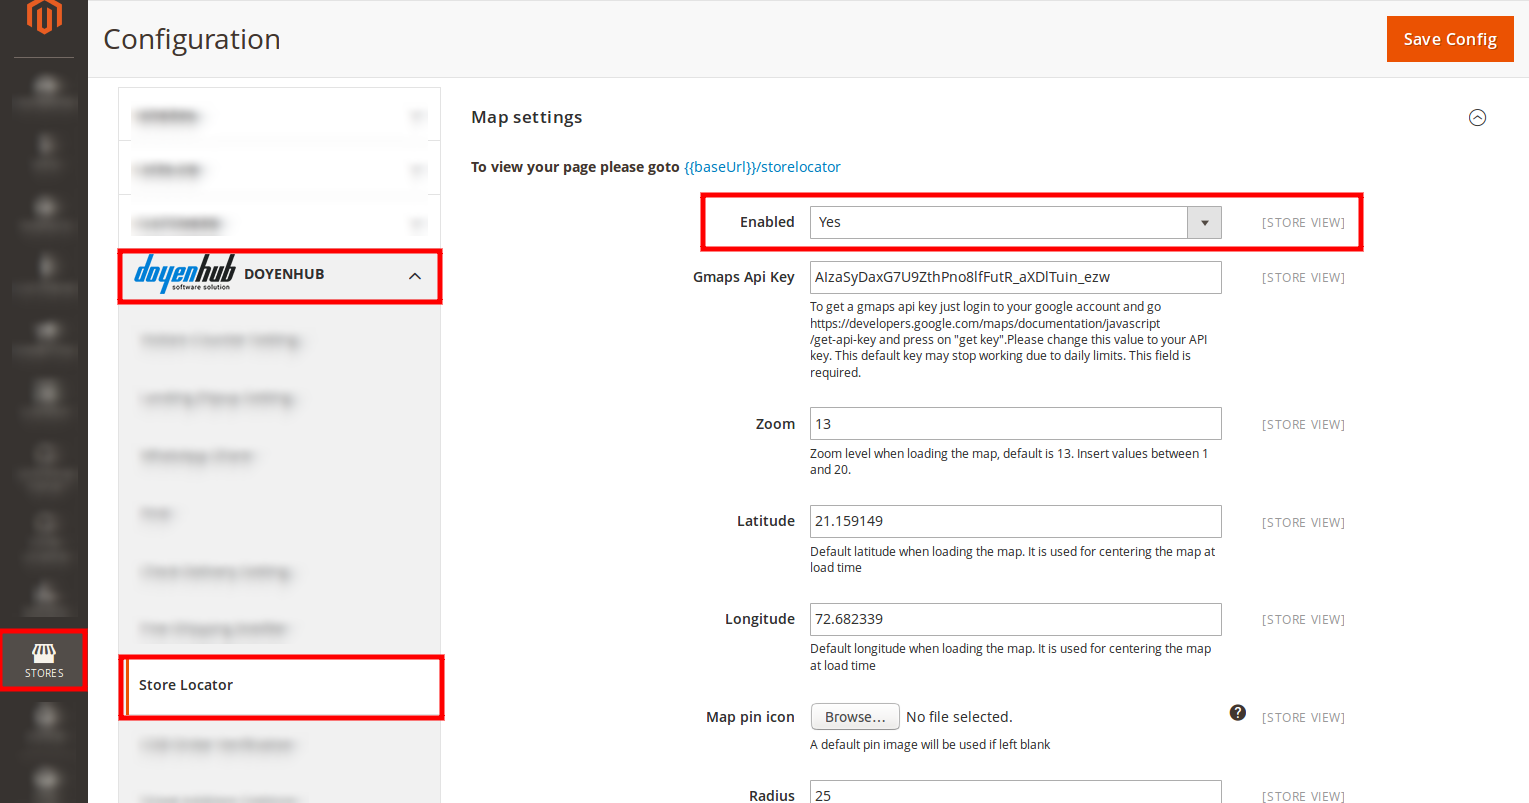
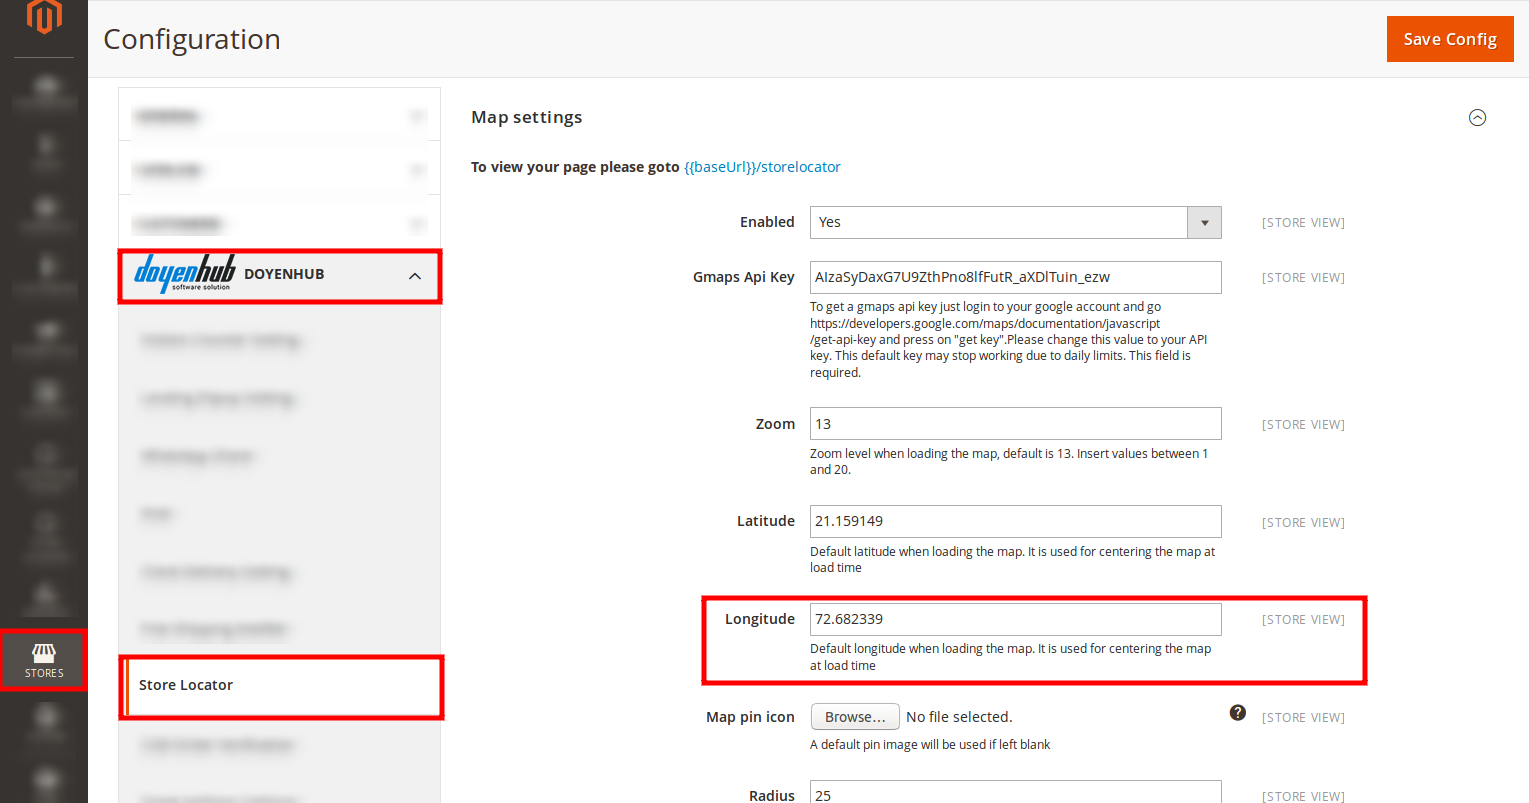
1. Go to, Store >> Configuration >> DOYENHUB >> Store Locator
Enabled Yes/No (Select ‘Yes’ to enable the extension)
2. Configure these extension settings as per your requirement
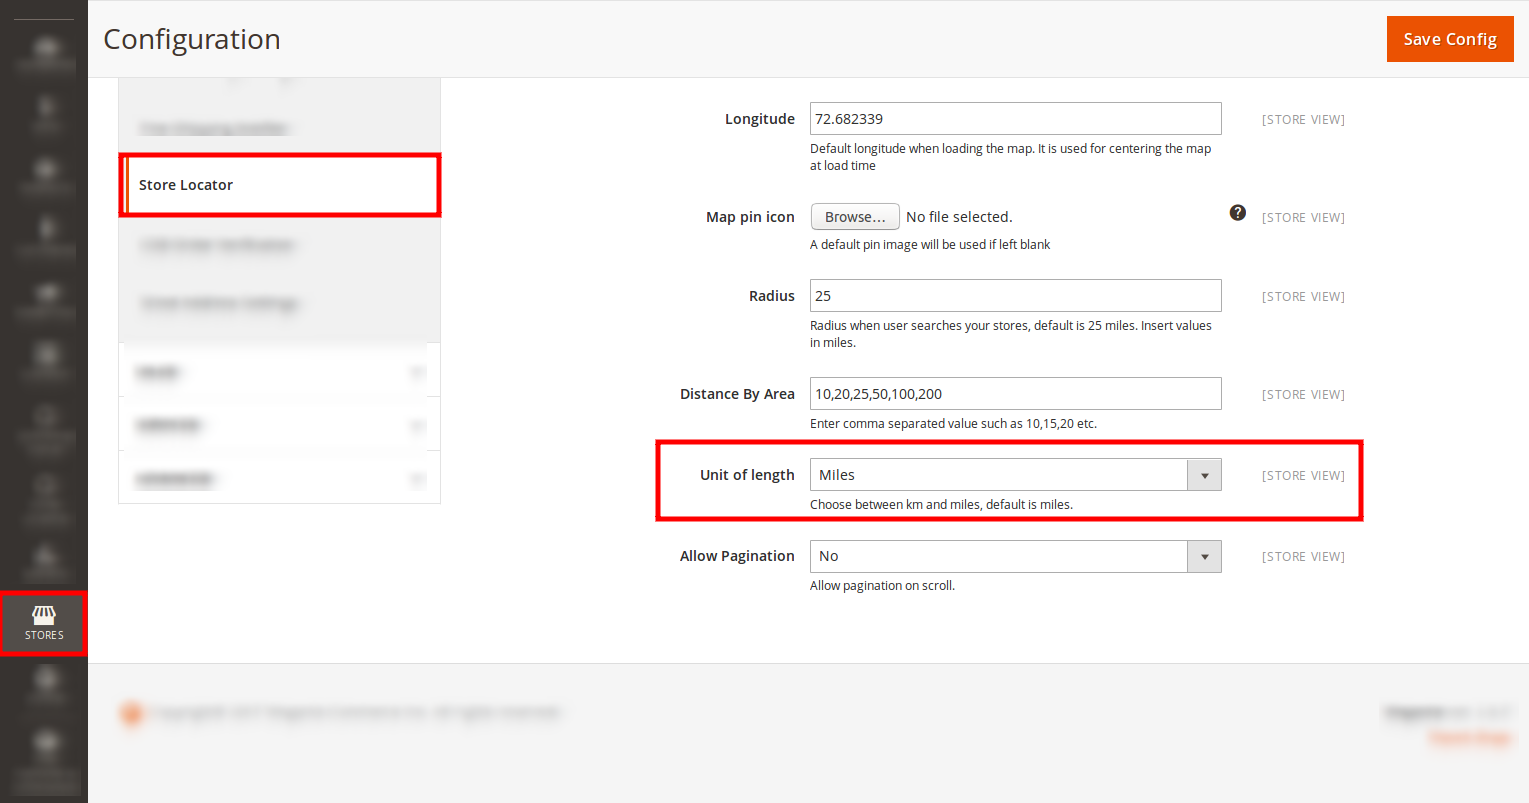
Gmaps Api Key Add google map key. Zoom Set zoom for maps. Zoom level when loading the map, default is 13. Insert values between 1 and 20. Latitude Default latitude when loading the map. It is used for centering the map at load time. Longitude Default longitude when loading the map. It is used for centering the map at load time. Map pin icon You can upload custom marker for the map. A default pin image will be used if left blank. Radius Radius when user searches your stores, default is 25 miles. Insert values in miles. Distance By Area Enter Comma Sepertaed value such as 10,15,20 etc. Unit of length Choose between km and miles, default is miles.
You can enable/disable store locator module as per your requirement. If you disable module on front end 404 page will be displayed as module is disabled. If you enable it you can see your storelocator page by entering your domain/storelocator.
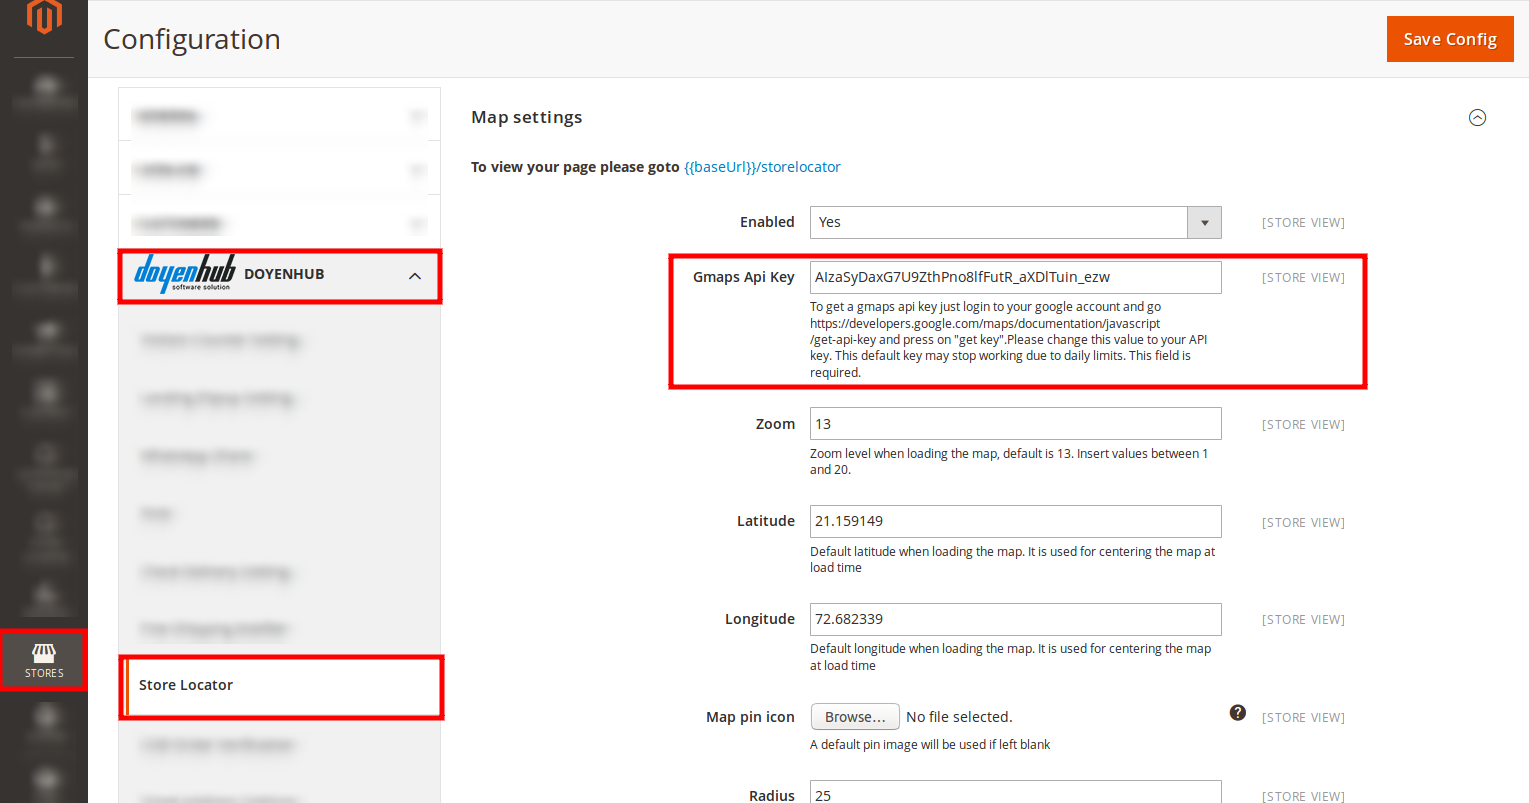
2. Google Maps API Key
Enter API key for google maps.
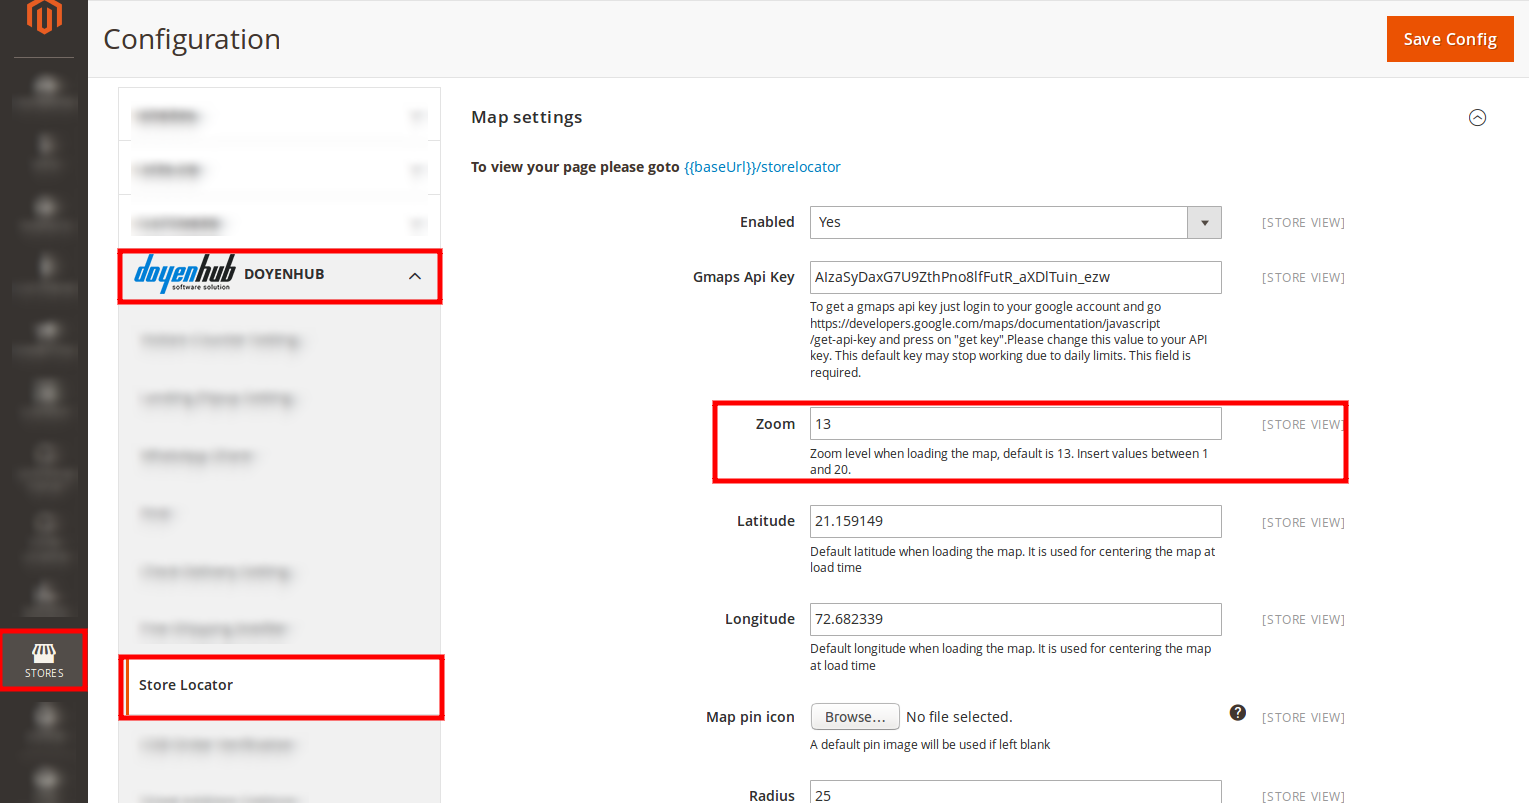
3. Zoom
Enter zoom level for your map when it loads. You can enter between 1 to 20.
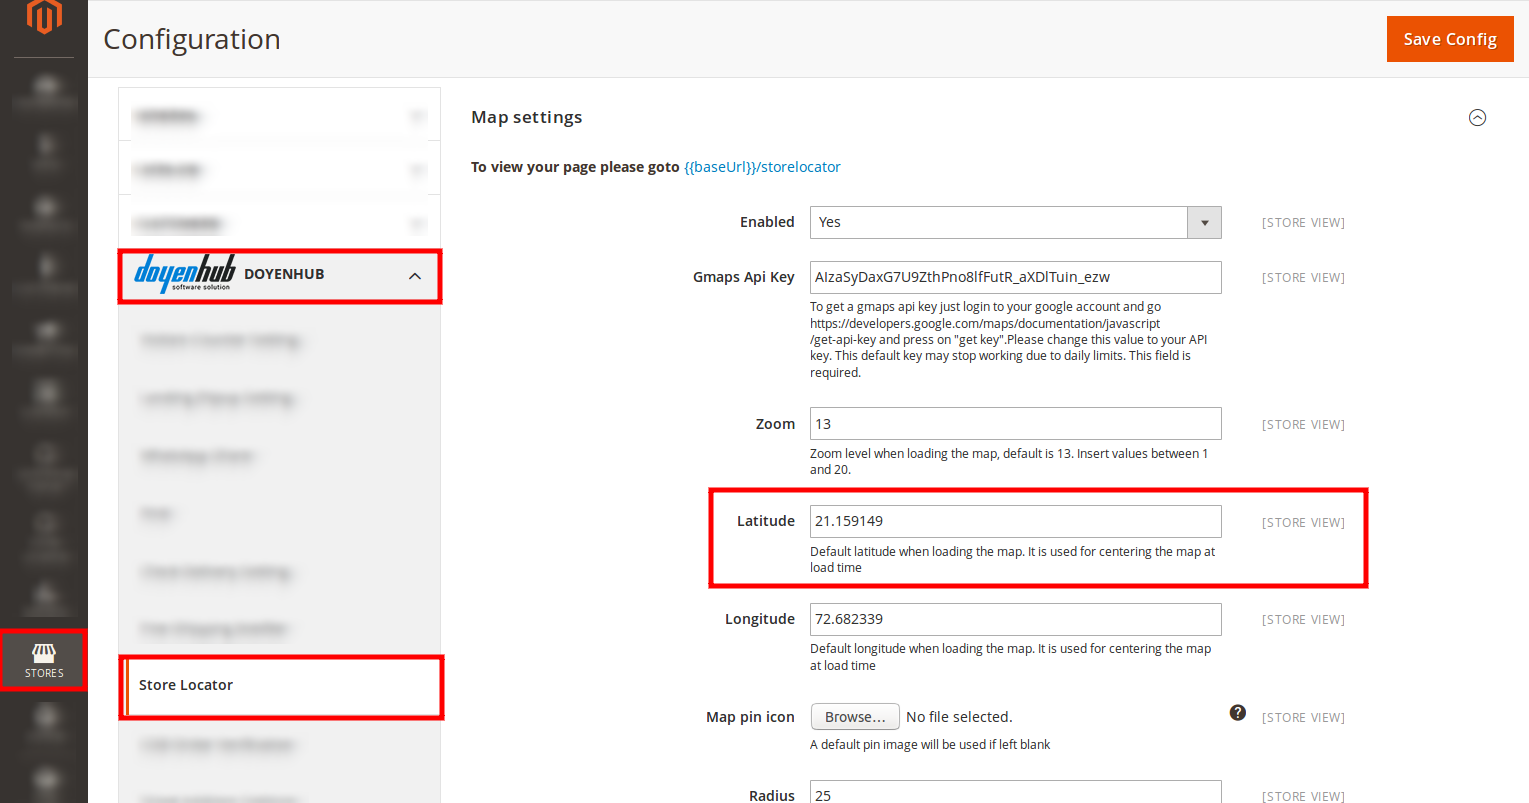
4. Latitutde
Enter default latitude when loading the map. It is used for centering the map at load time.
5. Longitude
Default longitude when loading the map. It is used for centering the map at load time.
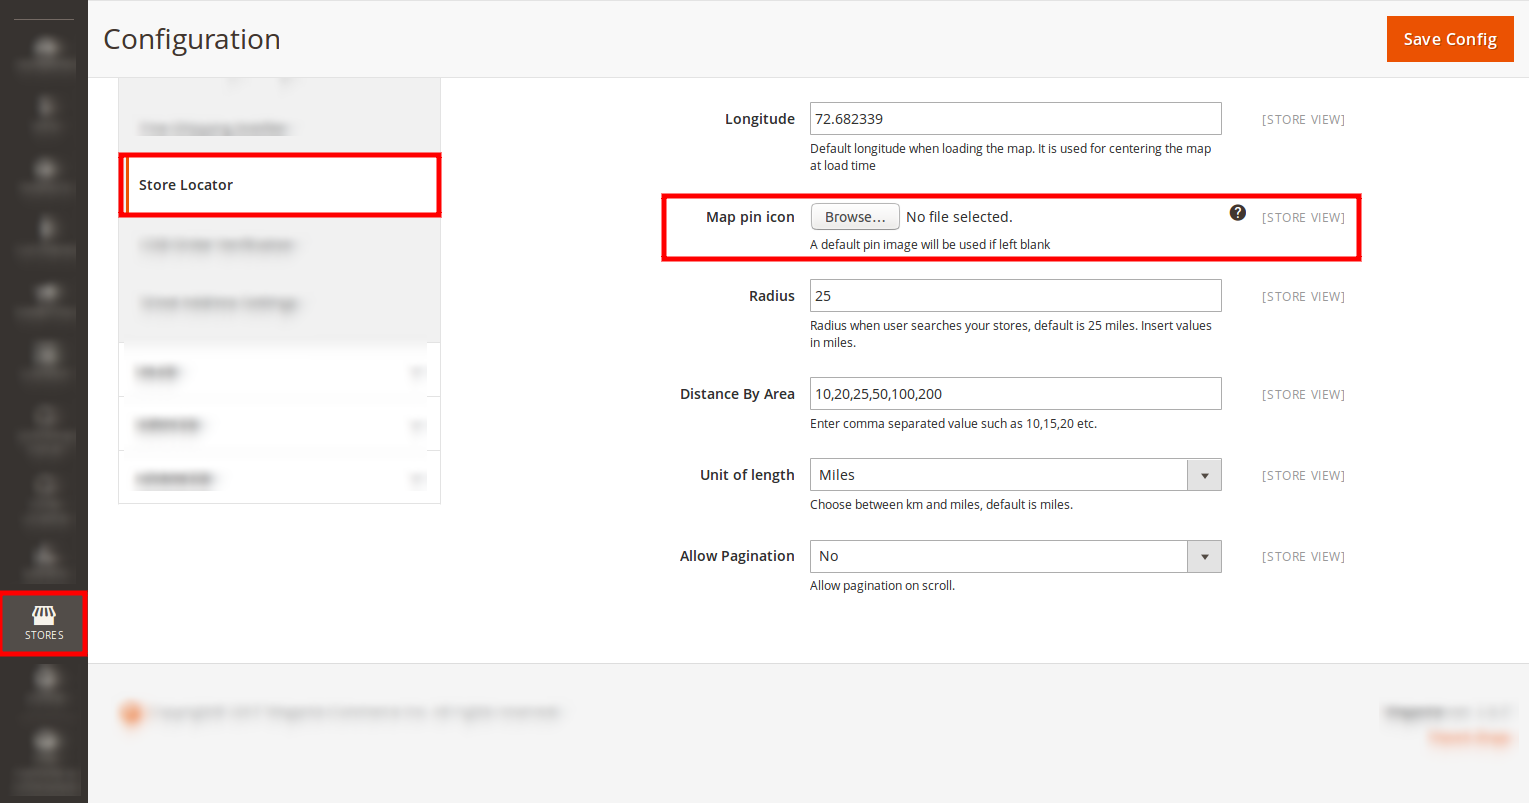
6. Map pin icon
You can change custom marker image to be replaced with default marker. If left blank default will be used.After uploading image you can change/delete it. Just select check box for delete image and image will be deleted when you save config.
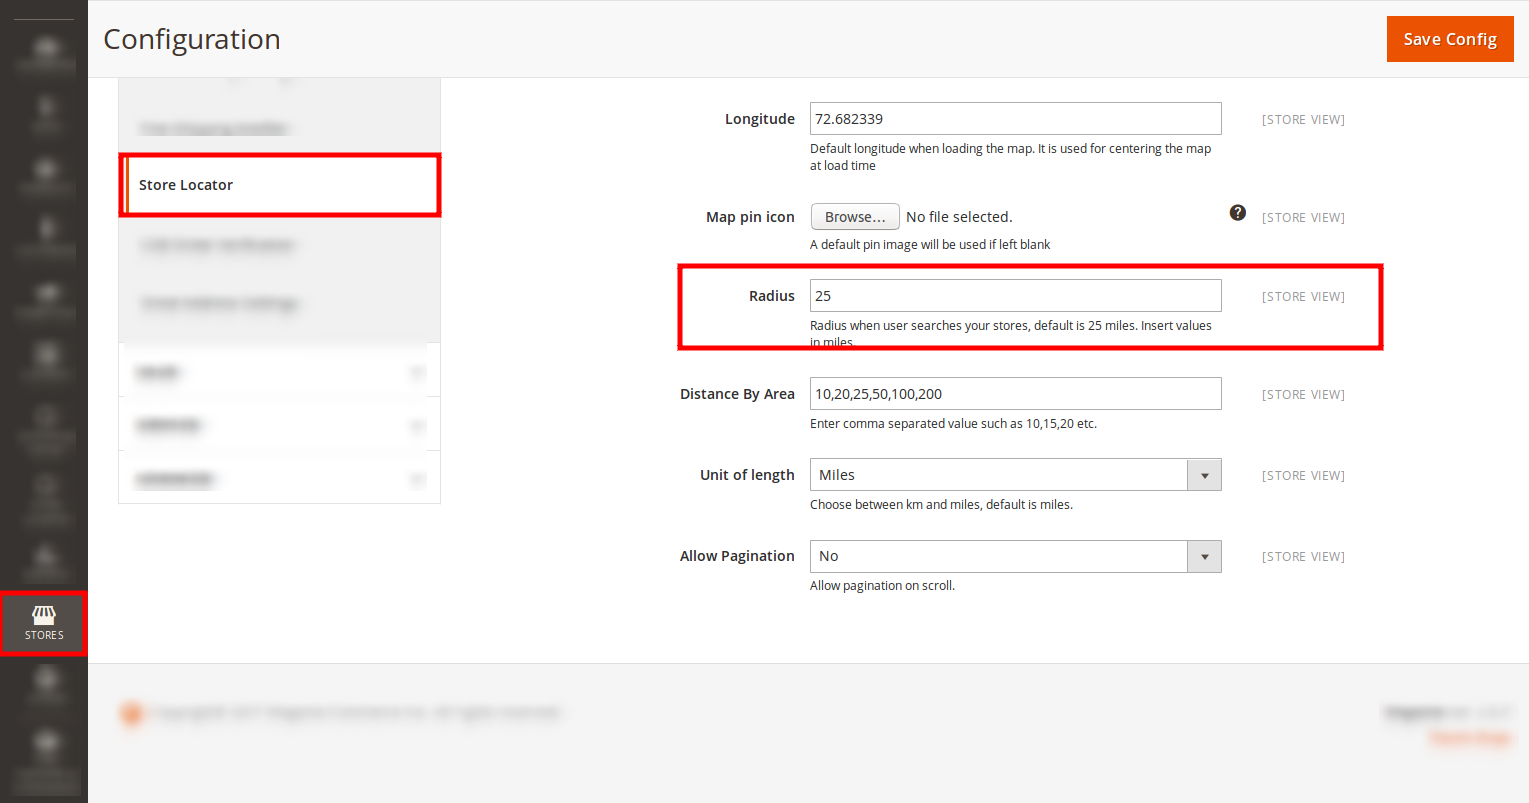
7. Radius
Default distance to be selected on frontend. Default value is 25.
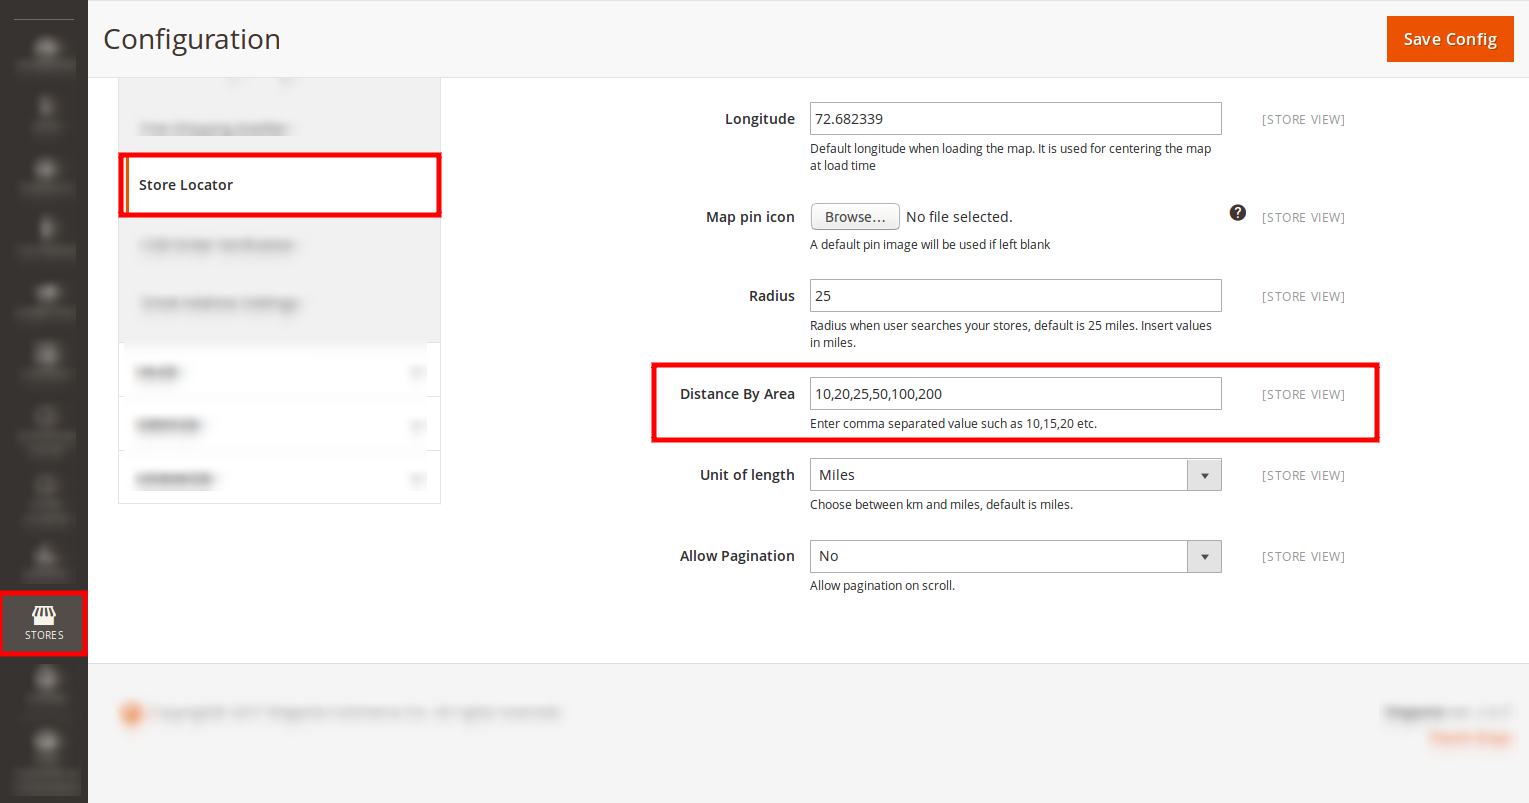
8. Distance By Area
It is use to render distance dropdown on front end. Add comma separated values in miles.
9. Unit Of Length
Specify unit of length. Default value is miles.After changing configuration click on Save config on Menu bar and clear cache from System > Cache Management > Refresh all cache.
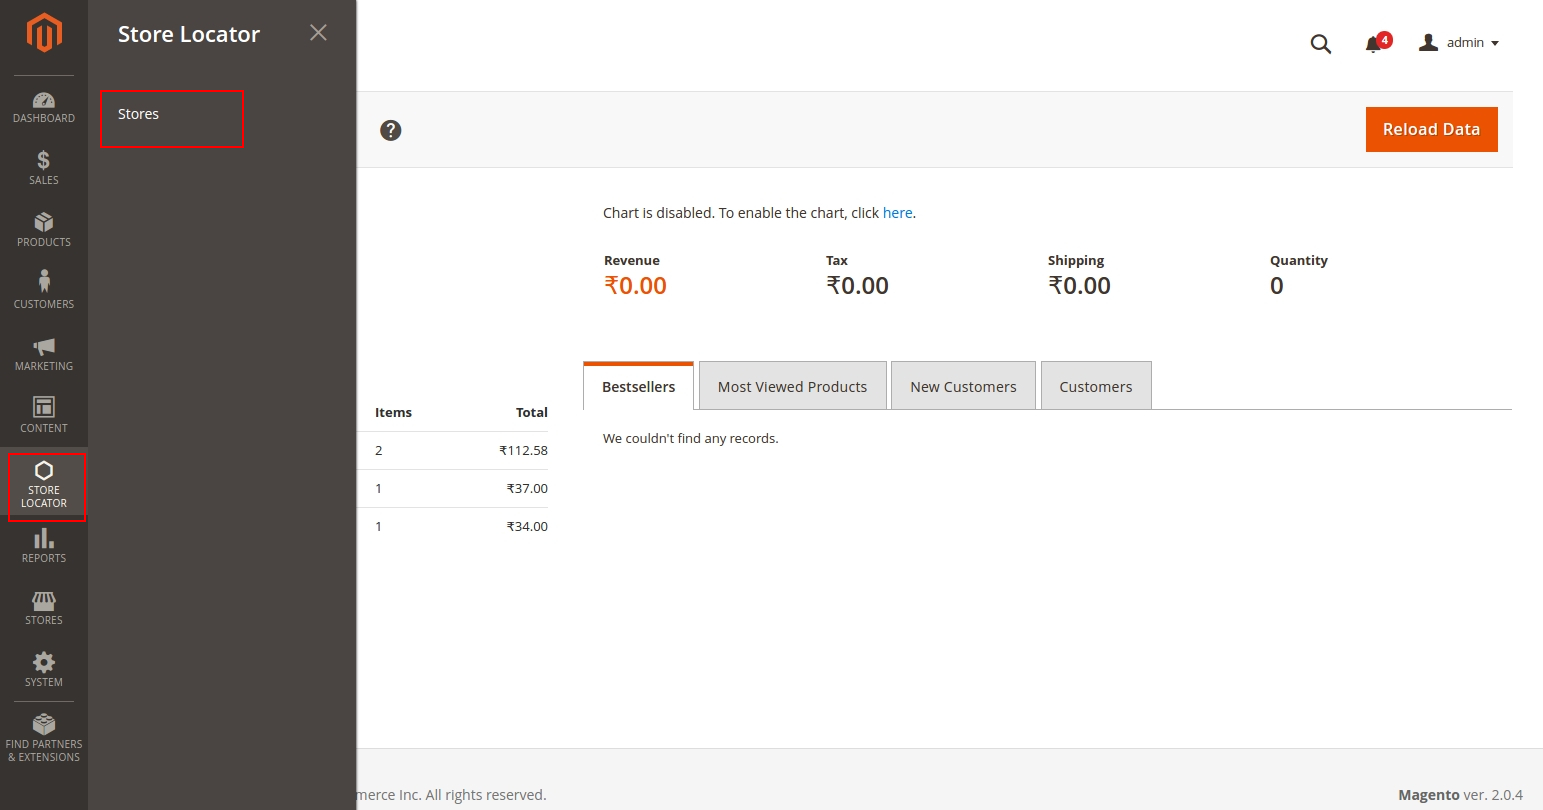
Go to Store Locator > Store. It will show grid with store details such as store Id, Name, Latitude, Longitude, Status, Country, Created date, Modified date and action. From grid you can do follwoing things.
 By clicking on store grid screen will be displayed.
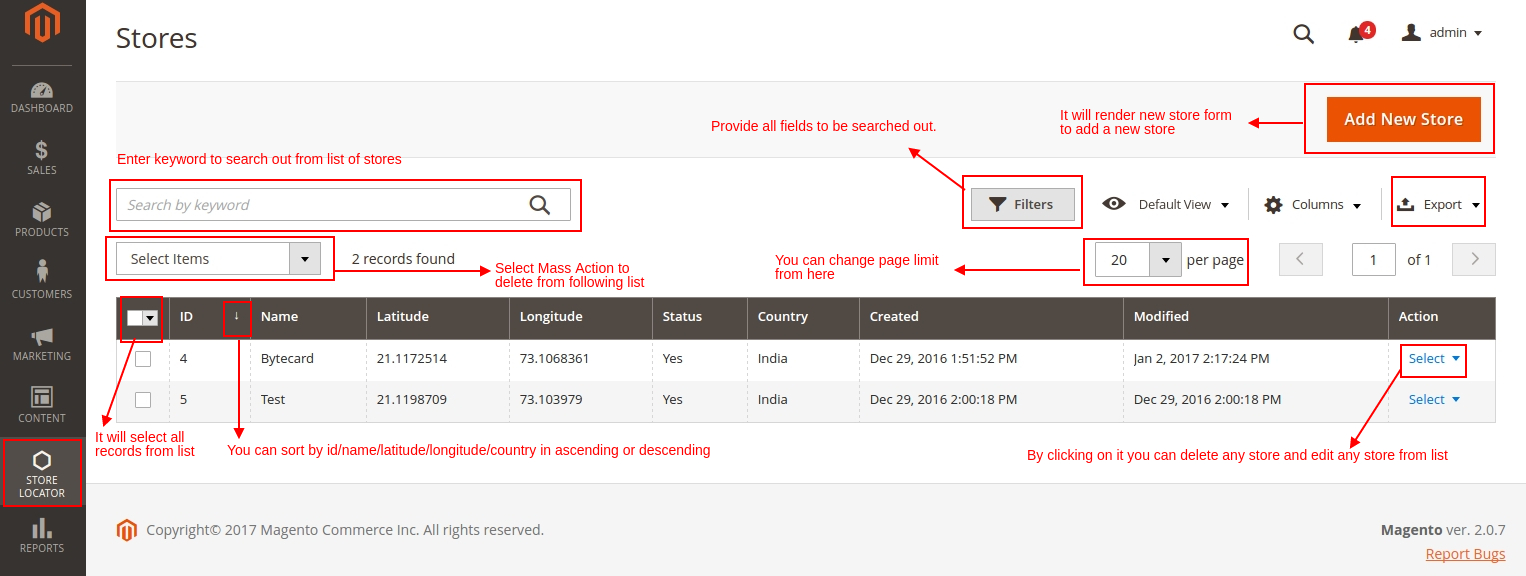 1. Search/Filterfrom list
You can serach stores as per your requirement.
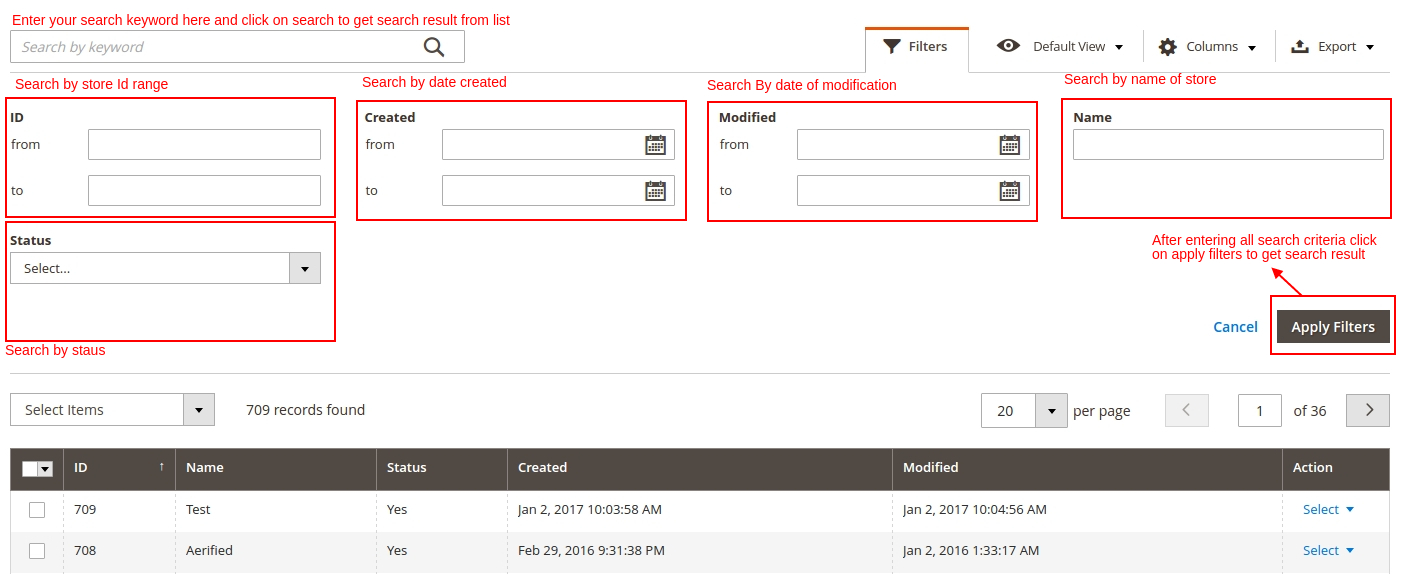 2. Export
When you click on export button on top all data will be exported in CSV/MS Excel Format.
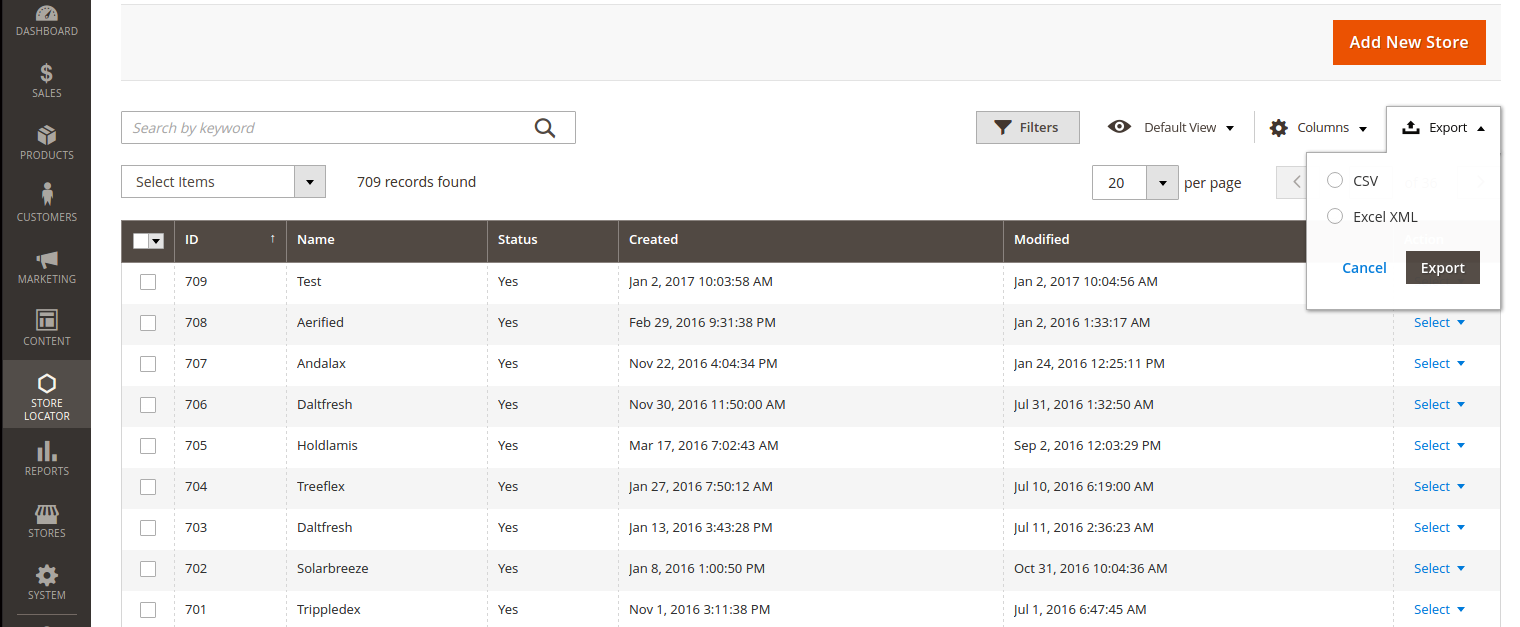 3. Mass Action(Delete/Edit)
when user want to perform mass delete at that time this tool is used. First select records which you want to delete and click on delete to remove it permanently.
For Edit select records and you can change title of all stores and then click on Save Edits.
 4. Page list
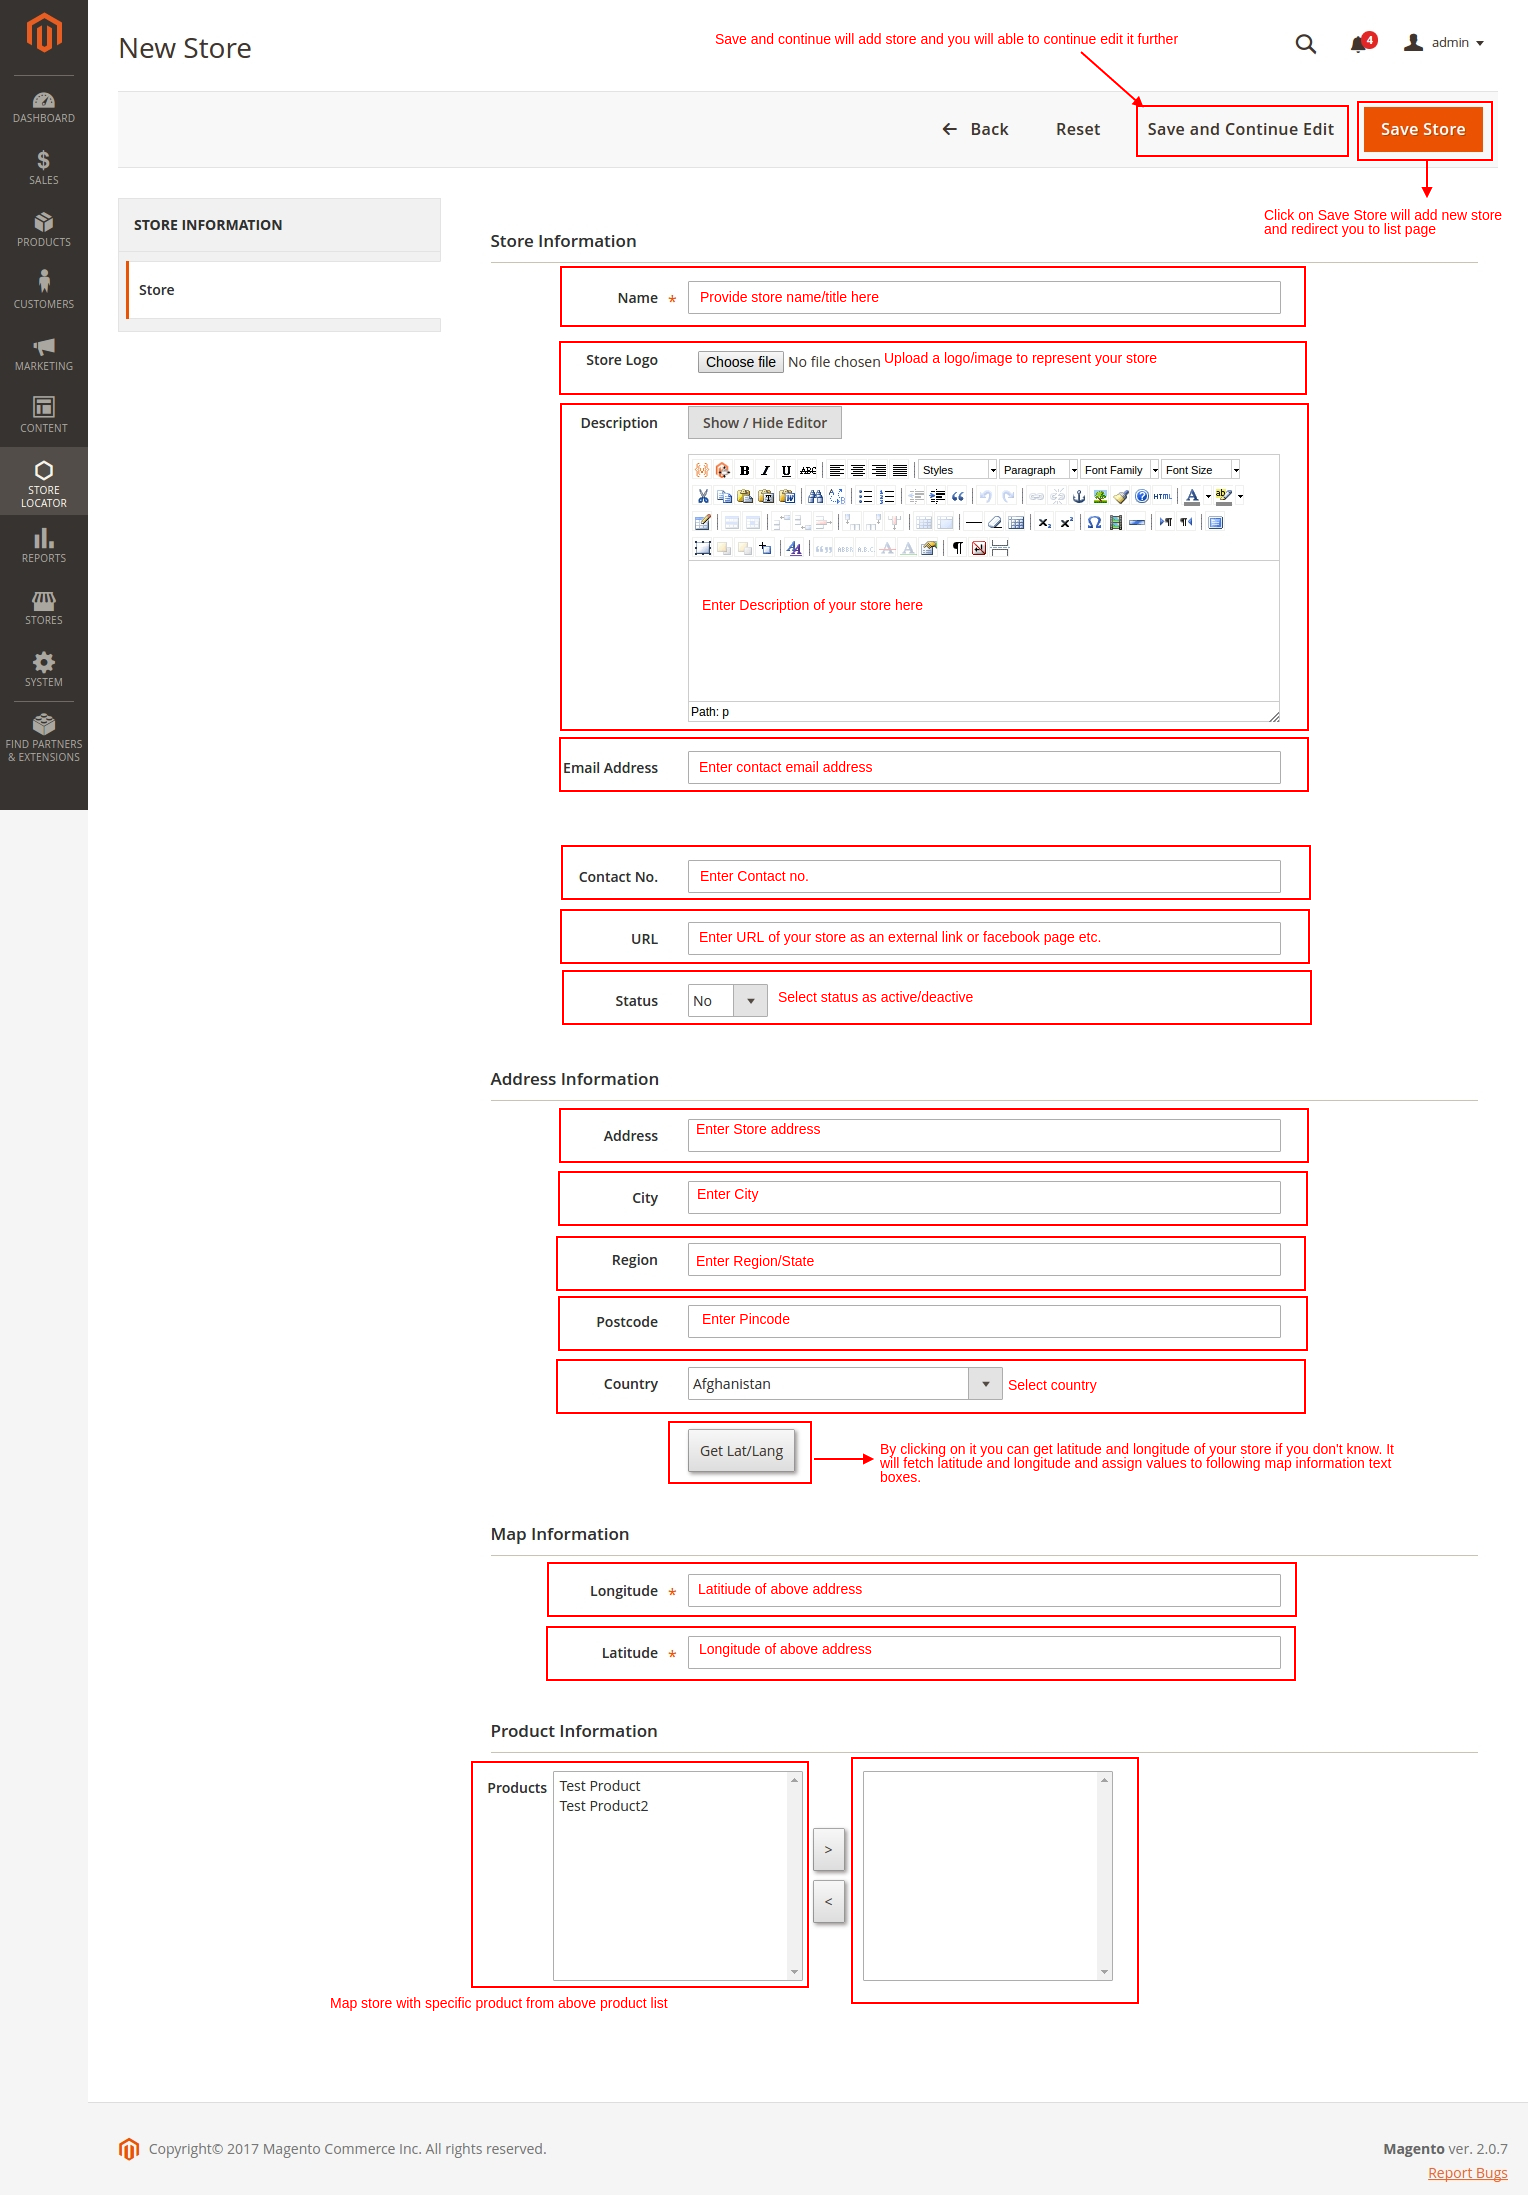
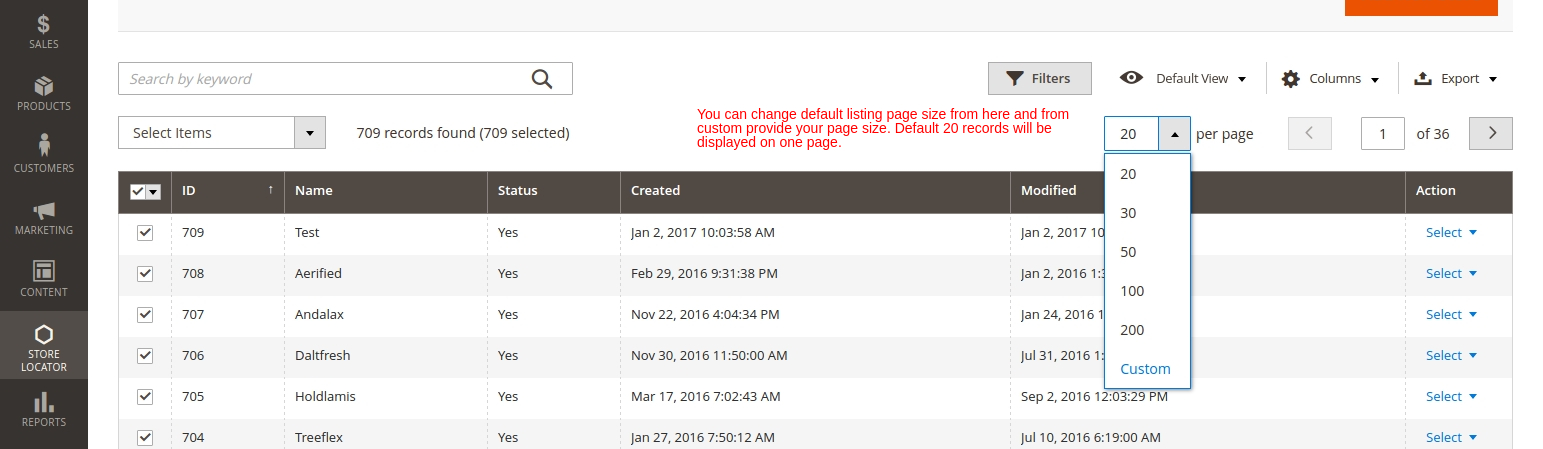 2. Add New Store
Step 1: Click on Store locator > Stores > Add New Store. Following screen will be displayed.
3. Edit Existing Store
Step 1: Click on Store locator > Stores. Grid will be displayed now click on the
Select > Edit on record you want to modify. Following screen will be displayed.
Step 2: After click on Edit following screen will be displayed.
4. Delete Existing Store
There are three ways to delete store.
1. Delete From Grid
Step: Click on Select > Delete to delete specific store from Grid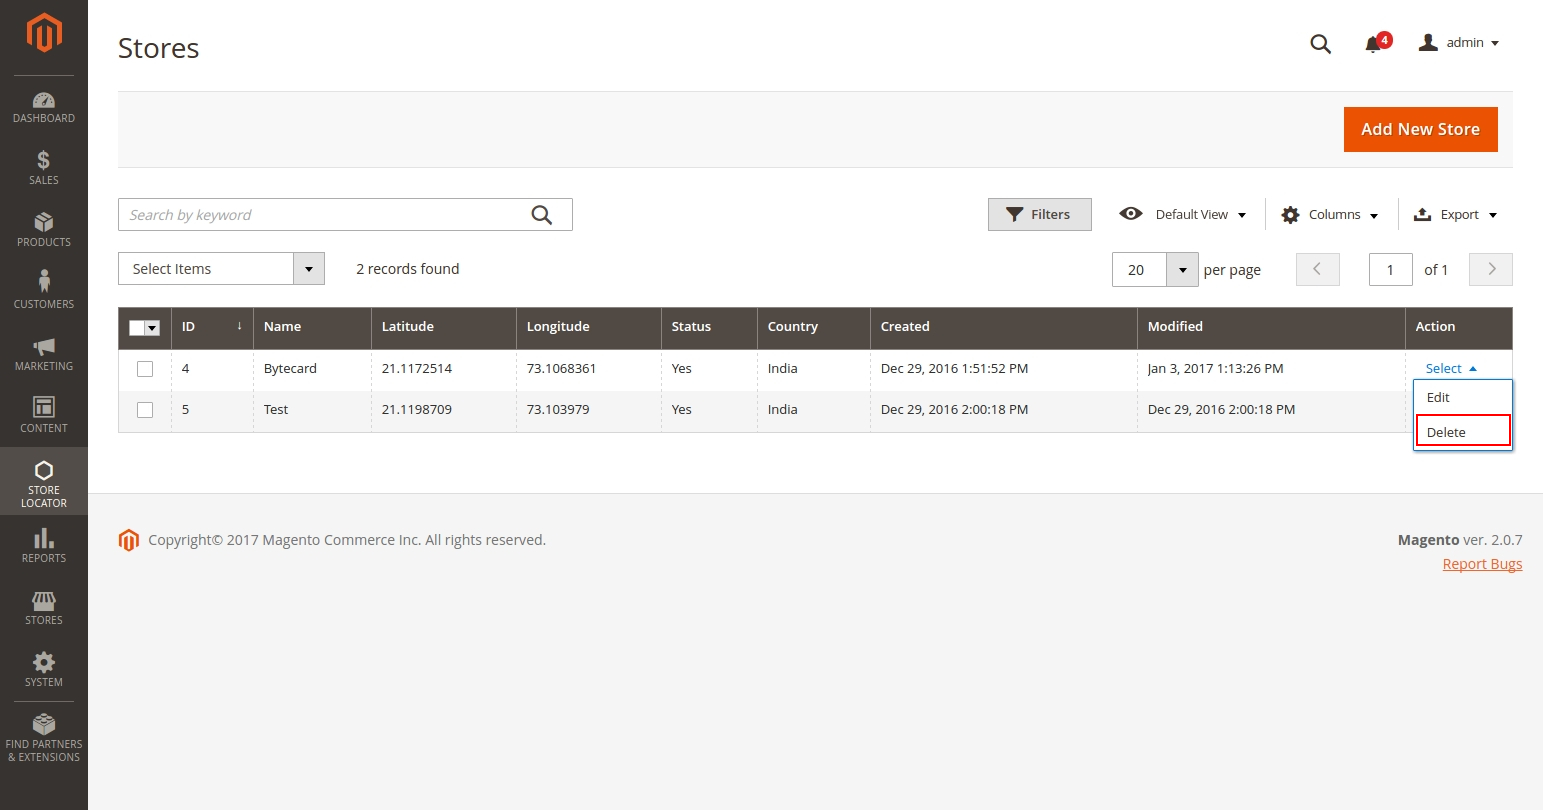
2. Delete Using Mass Action Tool

3. Delete From Edit Page
Step: Click on Select > Edit , Edit Store Page will be displayed.
From menu click on Delete Store to delete permanently.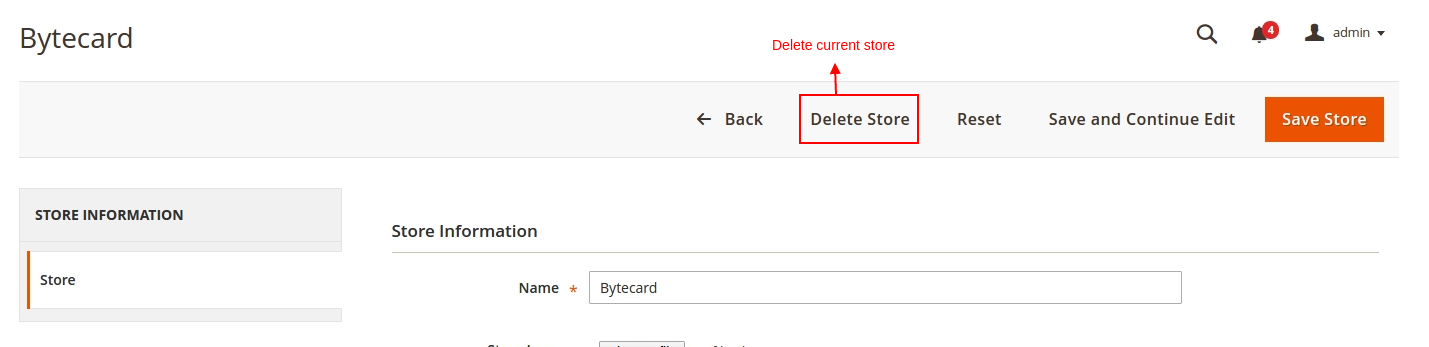
Step 1: From footer find Store Locator link or go to <domain url>/storelocator/ For example, http://www.xyz.com/storelocator/. Following screen will be displayed.
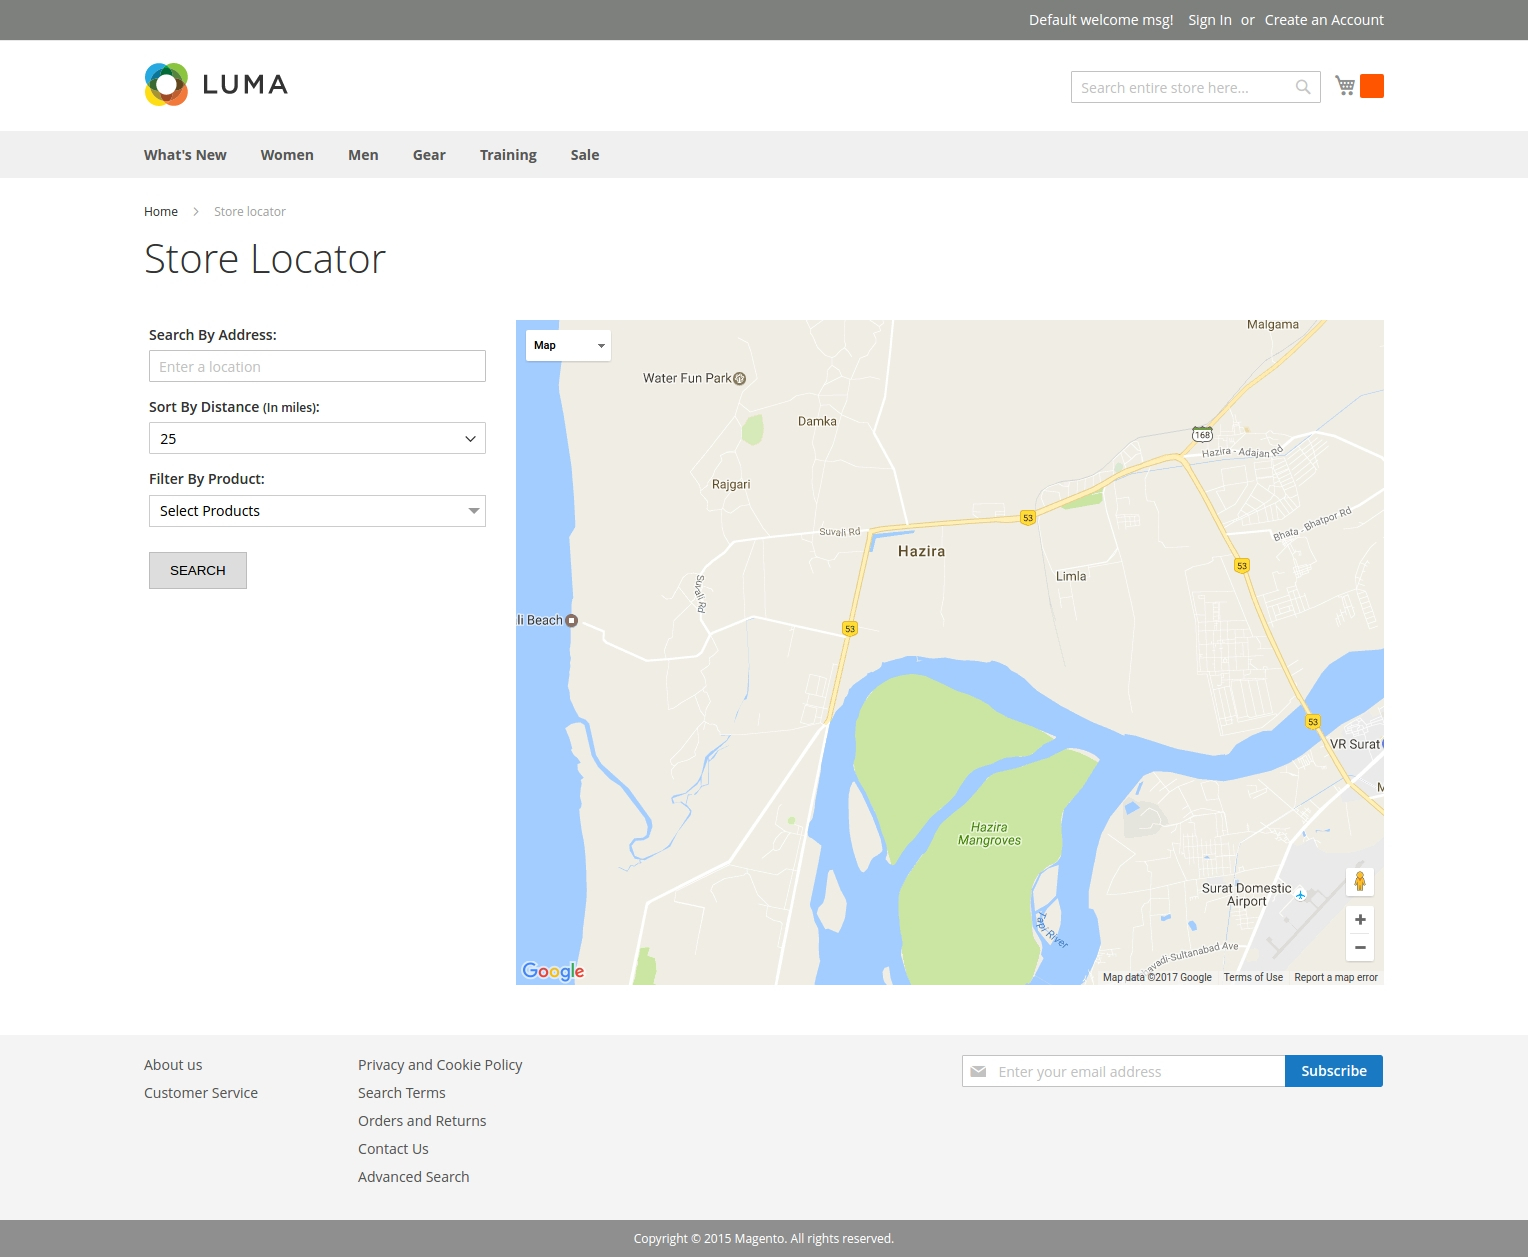
2. Search Criteria
1. By Address
You can search by address, city, state, pincode and country.
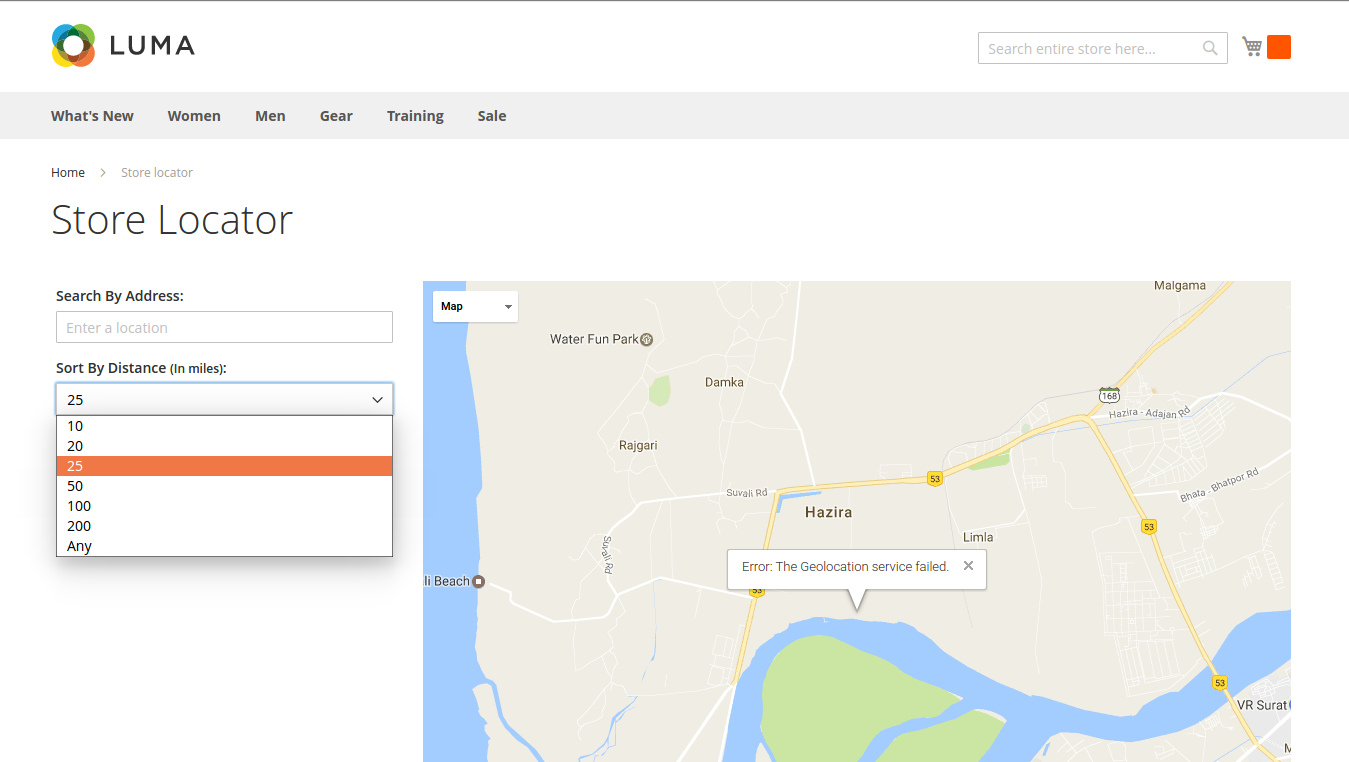
 2. Filter By Distance
User can filter by distance. Just select distance and click on Search to find in that radius area.
 3. Filter By Product
User can filter by product. One can select all product or select specific product to filter out. It will help user to search location for specific product.
 3. Store Locator with Search Result
Once user done with search following page will be dispalyed with search result.
